- 5/20/2016 07:03:00 pm
- 0 Comments


- 5/14/2016 04:29:00 pm
- 0 Comments
4/5/2016
After meeting on Wednesday with Phillip Vaughan and our team member, I update with the latest credit roll for Going Live project. After a discussion with our team member, they agreed to stick with the scrolling panel for the end credit. They also like it have some clue about what kind of show we are referring to. So, I create something similar with the background. I add flashing light to put the end title before the name scroll from below. Elena is working right now on everyone caricature face so I will update the end credit with the latest image.
After meeting on Wednesday with Phillip Vaughan and our team member, I update with the latest credit roll for Going Live project. After a discussion with our team member, they agreed to stick with the scrolling panel for the end credit. They also like it have some clue about what kind of show we are referring to. So, I create something similar with the background. I add flashing light to put the end title before the name scroll from below. Elena is working right now on everyone caricature face so I will update the end credit with the latest image.
9/5/2016
Elena finally done to draw all of our faces and I compose again in after effect for the end credit. Here is what I already compose and now the editing team will combine with other shot in premier.
- 5/09/2016 08:23:00 pm
- 0 Comments
We start on Monday to compose the files that already come out from the render farm. We try to achieve all the aspect that Matt Cameron had teach us on Friday. But for the moving image we need to change a little bit of the node and try again another node to match with the animation. We use at least 5 to 6 image sequences such as, diffuse, master beauty, indirect, ambient occlusion, specular, reflection and depth. We then arrange and merge them to another like a chain and add another node to highlight the character.
As we explore and try different node, we use the same node with another person in the composition team to synchronize the environment. The several node that we use such as, grade to highlight the light and tone, blur and grain to make the animation less cg, zdefocus to make a tilt shift effect so the character will be more realistic and also some other node.
Below, several shot that I already done on compositing but maybe just need to be check again by other member to see the quality and consistency of each shot. I enjoy doing the compositing and a little bit surprise to learn it fast.
Shot 02


Shot 06


Shot 07


Shot 18


Shot 28


- 5/05/2016 05:00:00 pm
- 1 Comments
Update on Going Live project, this is the end credit so far that I have done today. I try to refer from the end credit for the Jeremy Kyle show and create a border that look similar to it. I also change on how the name of our group member appear from scrolling above into move in and out from the right screen. We also agreed to change the character into our own caricature face. We will put the end credit into the TV screen and play it along with the same end song from that show.
Everyone work very hard to achieve the target in this group project and I really thankful to have such a great team. I will help them finish all the compositing in Nuke and tried to amend any changes in this end credit.
- 5/01/2016 05:30:00 pm
- 0 Comments

We learn several thing in Nuke like how to roto paint and image using the node and merge different type of image together. At first, I kind of thinking that this software will be difficult to understand but with the explanation and tutorial from Matt make me enjoy this lesson and want to explore it more.
Here, I put several image of what we learn on basic introduction on using Nuke.


In the afternoon, he showed us the interface and start teach us on how to comp out a tracking marker with a plate from his short film. In the afternoon he show us to compose using Nuke for our going live project. He showed us how to use our depth pass to blur the background to give our shots like a tilt shift effect. He also add grain to the shot to make them look like a photo realistic.
Below is the result that Matt already got when he compose our shot 4 into Nuke and it look way more better than before with all the effect.

I start to enjoy learning this new software and we also decided to compose all of our shot in this software. So we start to compose using Nuke on Monday and it become more handy after I explore all the node and how to merge with all the passes. I will update next with all my composition that I already done in Nuke in the next post.
- 4/29/2016 10:00:00 pm
- 0 Comments
Update on Going Live project, this is the end credit so far that I have done today. I use Adobe Photoshop to create the background using symmetry triangle and use several layer for gradient, curve and colour effect. I create a multiple layer for the text before I add a several layer effect for the name and try to imitate the Jeremy Kyle Show logo. We also choose our favourite image from Guess Who board to be as ourselves in the end credit. Thanks to Elena, she would gladly to draw a caricature of our faces and I will change this after she finish with that drawing.
Next, I use after effect to compose this end credit to be play around 30 seconds. I'll try to adjust the timeline to make this end credit to be like exactly the end credit for the Jeremy Kyle Show. We also had been discuss about to put the end credit into the TV screen and play it along with the same end song from that show.


- 4/27/2016 10:55:00 pm
- 0 Comments
Today we continue on setup the shot for rendering. I amend shot 12 render setting and continue on shot 10. Below is the final image from the full render setup for this shot.

For shot 10, it need an adjustment for the camera setup. After watching the pre vis and discuss with our group member, so this is the final angle for this shot. I make a lip sync for this girl rabbit and re-do some of the animation that had been done before.

Like I do for other shot, I just need to import the static object that they had create for the environment of the living room. Then, I need to adjust the material using the setting that they had provided.

I test render for several time to make sure all the material are correct and check the render time. Right now for this shot, it take around 38 minutes for only one frame. I need to clean up unused object that will not been show in the frame to help it render more faster.


Here I put my playblast to show the new camera angle for this shot 10.
- 4/14/2016 08:51:00 pm
- 0 Comments
Today, for our group project we started to arrange all the character and asset in the final environment. We are already done for animation and just need to tweak a little bit on certain movement and camera angle. So, I took shot 12 to work on today and render it out. But sadly I forgot to use the passes that our group member already given. I need to fix it tomorrow and put all the passes before our render manager can put this scene into the render farm.
Overall, this is all the image from my render setting and what I got without using all the passes. It quite impressive how our render manager can manage to make this toys look like a real one after it had been render. With all the lighting and perfect material can make all this toy came alive. I was happy to learn all the new thing from this Going Live project with everyone.


- 4/13/2016 09:21:00 pm
- 0 Comments
So, I started animated for Girl Rabbit today. This is one of the scene that I had done today. The girl rabbit don't have any dialog but had been accused by the He-Man voice. I choose to make a little expression of shock in her face and make her head shook left and right before point her head to the audience.
- 4/06/2016 08:00:00 pm
- 0 Comments
We started to lip sync on our ongoing group project for Going Live. I got Shot 18 when He-Man shout to the panel 'Shut Up' for several times. Before this I have done a lot of lip sync in 2-D but this is my first time to do it in 3-D. It's a little bit different because of the key and I need to understand the function of each blend shape. Thanks to Nelysa to fix and synchronize my lips animation.
Now, I know that 3-D lip sync are a bit difficult. It depend on how our character will be look like in each shape of the mouth. I use in 2-D because the mouth shape is kind of easy to understand and follow. I need to learn more from others and improve my lips sync for better result.
- 4/04/2016 01:30:00 pm
- 0 Comments
We had a good feedback from Axis on Skype meeting this week, So overall character turnaround have turn to be good except the robot. So, I experiment again the robot texture to make it a little bit rusty and play with a different material. This time I use Mia x passes as my material. Now it have a better look as a metal rather than using blinn material before.


Here, I put overall character turnaround per image an whole turnaround movie.


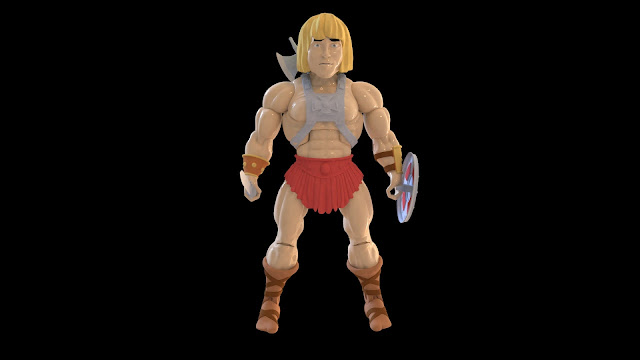
- 3/24/2016 09:00:00 pm
- 0 Comments
I'm excited for our team project Going Live this weekend. We are now in the stage of animation and everyone are finished with modelling and all the texturing. So, I had been given a job to do all the character turnaround for this animation. Thanks to Krish and Sean for given me the IBL lighting. I need to adjust each character position and change the reflection and lighting for the material that had been using for this character.
After all, I learn something from this work because my lighting for last semester project is not good. Now I understand how to use the IBL Lighting and to control the reflection each material that had been used. I can learn something fast if I can understand exactly the function and purpose of what I am learning. It's not how I follow other to do it, it's basically what I understand when I'm doing practice again and again.
Here, I've done with He-man, Trouble Girl, Father and Baby Rabbit. There will be three more character to be done for this turnaround; robot, and a couple of trolls before I import and edit in Adobe Premier.


- 3/18/2016 06:00:00 pm
- 0 Comments


